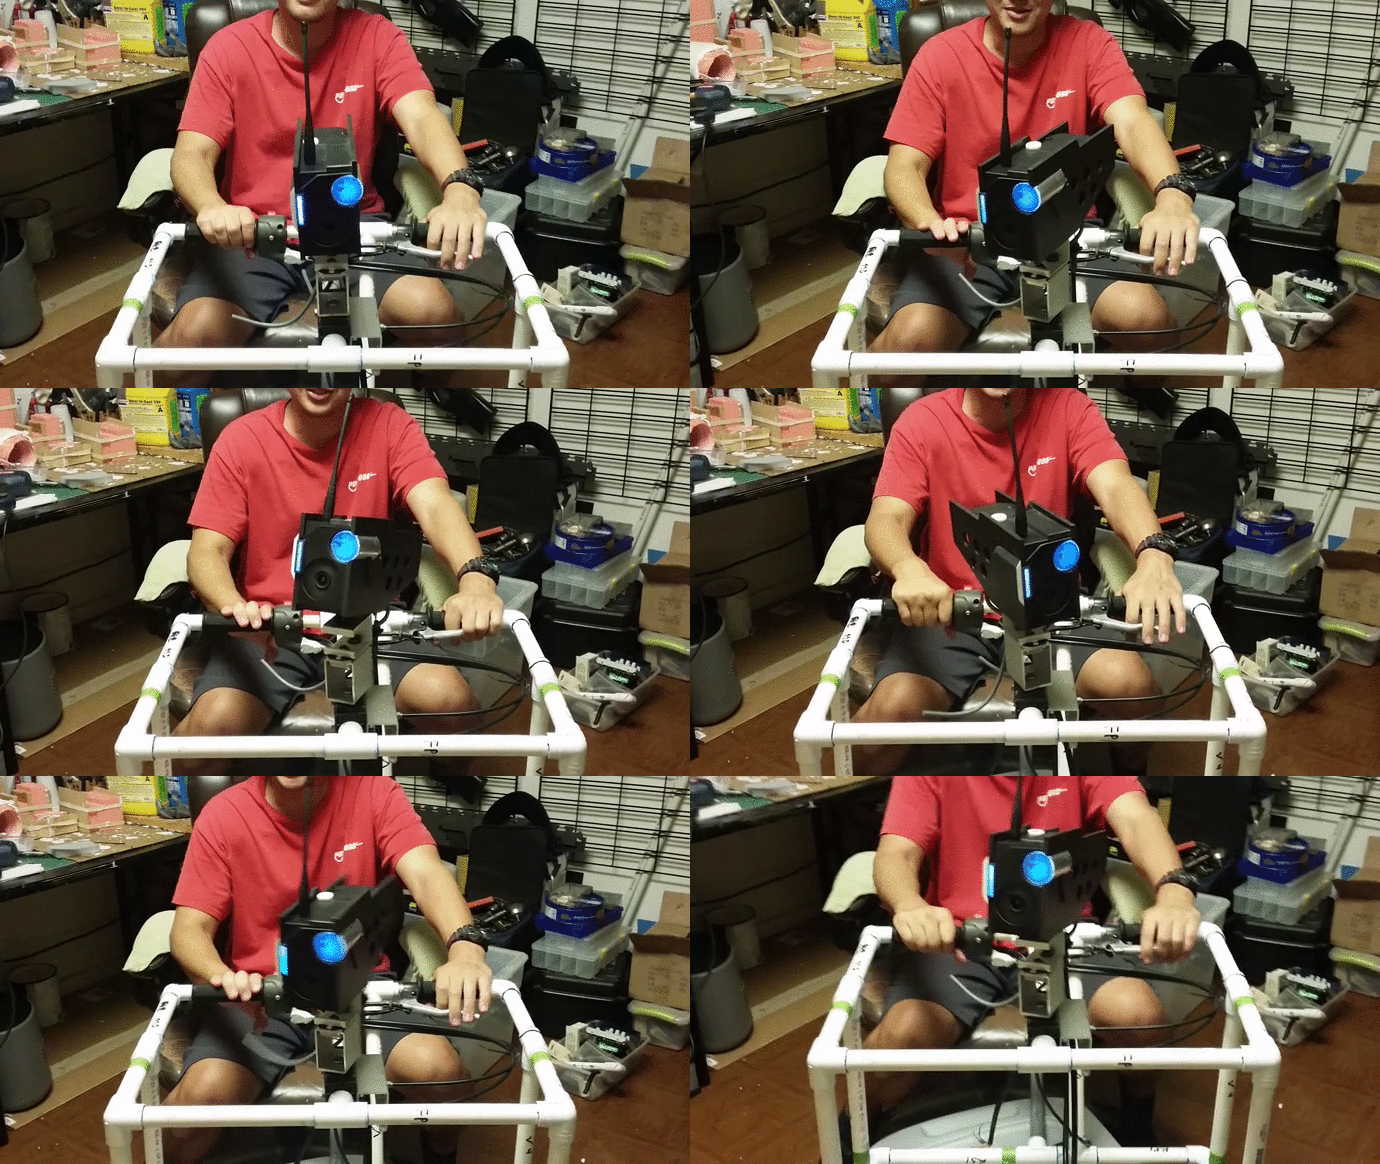
Sunday, June 5, 2016

D-Walker build part 1 - Design


Hi!  This is a breakdown of how I built D-Walker from Metal Gear Solid V.  It gets pretty detailed, especially as to the source of the materials - this is because almost everything used was left over from old projects.  I wanted to use up as much of my surplus material as possible before moving across the ocean next year.  In this respect, D-Walker is a culmination of most of my various projects over the past ten years and a fitting final project before I pack up my tools.


The history of the items is only really significant to me, but where I got them and how I used them might be interesting or useful to you.  From brainstorming sketches to final construction, everything was designed or improvised around a collection of random junk.  My goal was to keep the project as simple as possible while still having some cool, seemingly complex features.  I got a little carried away on some parts, but I would still describe the build as pretty basic and not requiring much in the way of special tools or skills.

This build will be broken up into sections going into the details of each major part.  There is a video showing final assembly and testing of the main components in the conclusion section, but in case you don't make it that far, here it is!

This is the design phase, in which I planned out the frame and major components.  I began on or around April 1st, 2016.


Frame

I started by designing a PVC skeleton that would be fitted with EVA foam panels and suspended from a belt.  The frame had to be able to support the head, arm, and weapon (I didn't end up building a weapon though), as well as extend between my legs to support the rider's fake pair of legs.  The inspiration for the fake legs gimmick comes from that sweet inflatable T-Rex rider costume.


I only had a little bit of scrap 3/4" PVC, so I had to buy most of the frame parts (~$50 worth).  The frame has plastic feet towards the front (integrated with the fog light housings) so that it could be set down on the ground without messing up the foam.  These plastic feet are motorcycle frame sliders that came with my bike, retired after taking too much damage.


The fog light housings are scratch built from Celtec and clear acrylic, with yellow vinyl for the tint.

At first I was just going to suspend the head in some super simple method, like tying a rubber band around a length of PVC.  This PVC "neck" would extend into the body cavity and could be moved by reaching my hand inside, or by attaching a weight to the bottom.  I had something similar in mind for the arm.  However, I was not really feeling this approach.  By digging through my bins of materials, I found inspiration to make slightly more complicated mechanics for the head and arm (which absolutely had to be articulated).

A scrap piece of aluminum C-channel from my old solar job became the solid base for the moving neck parts.  More scrap pieces were also used in the shoulder and neck articulation points.

Borrowing from my bike again - my supermoto came with an aftermarket throttle assembly, as well as the stock parts.  The stock parts sitting in my bin were too cool and too appropriate to ignore.  I ended up using the stock throttle grip in the arm mechanics, and I bought another set of controls for the head.  The throttle and clutch assembly came from an 06-ish Kawasaki Ninja 250, purchased for $50 from Sportbike Hawaii, a tiny local motorcycle shop (I over paid for these, but I like the guy and he has worked on my bike for free in the past.  Plus they were vital to the design).

Motorcycle controls work by moving a steel cable through a flexible but fixed rubber sheath.  The throttle has both a send and return cable, meaning either way you twist it, one cable is pulling in and the other is extending.  Even while installing the controls, I wasn't really sure how I was going to utilize them.  Eventually I decided the head would sit on a hinge, which sat atop a swivel, turned left and right by the dual throttle cables.   The clutch lever pulls a cable attached to the back of the head downwards, tilting the head up.

The green marks on the frame are the joints that are not glued.

The key to the pivot is the carriage bolt visible at the base of the neck.  The underside of carriage bolt head is squared, and this square fits into a square hole in the aluminum neck riser.  The bolt rotates freely within the neck base and frame, protruding down through the PVC.  An aluminum arm is threaded and secured to the bottom of the bolt, and the throttle cables are attached to either end of the arm.  Another aluminum bar clamps the round tabs at the end of the throttle cables in place while allowing them to rotate.

Blue Kevlar string keeps the clutch cable out of the way of the rotating neck parts.  The string was a rather random gift from my girlfriend that eventually proved invaluable because it does not stretch and is very durable.  

The arm would be on a pivot at the shoulder, actuated by pulling a lever.  The gif below demonstrates it better than I can explain.  The throttle grip used on the arm lever had the same potential to twist and pull cables as the head controls.  It would use a pulley system to extend the arm at the elbow (more on that later).


Almost all of the nuts, bolts and washers were sitting in my toolbox for such items, so sometimes the sizes or heads did not quite match up or bolts needed to be shortened.  The aluminum stock was either scavenged scrap or removed from a now obsolete rack made to transport my girlfriend's baked goods.  Unfortunately I didn't get anywhere close to using up my supply of aluminum C-channel and stainless hardware.


Rider

A key part of the "rider" type costume is that the D-Walker mech, while capable of autonomous operation, could also be piloted by a human.  While I could have made just the D-Walker and hidden my upper body inside, I knew the simple visual trick of swapping the pilot and mech legs at the waist would produce worthwhile results.  Plus I did not want to be hunched over inside a foam box for several hours.  I designed the frame angles so that I could sit down without taking any part of the costume apart.  I did not, however, explicitly plan for bathroom breaks.  I can't even walk through a regular sized door while in costume, so urinals and stalls were out of the question anyway.

Just some fake legs.  I ended up removing a lot of stuffing from the calves and all of it from the thighs.

I got lucky and found used U.S. Army coveralls at Goodwill for $8.  While the digital camo pattern is not in MGSV and is not time-period accurate, the fact that it was all a single piece would make suspending the fake pilot legs much easier.  I also found a black down coat (~$6) and grey denim jeans ($4) on the same trip to Goodwill.  The coat would be used to make the arm bands on the coveralls (which turned out to be a huge feathery mess and a lot of sewing trouble), and the jeans would be the base for the mech legs.  The jeans had to be denim because it wrinkles the least and it had to be sturdy enough to somehow attach foam panels to it.  The color palette of the coveralls is what dictated the paint job on D-Walker.

Looks like bullfrog road jerky.

The coveralls are cut open in the crotch so that I can wear the upper half while the stuffed legs dangle behind me.  A wide molle belt attaches to the pictured carabiner, which in turn clips onto the PVC frame.  The fake legs attach to the PVC footpegs - at first I wanted to go with magnets, but I ended up strapping them on with a a more secure quick-release paracord latch.  The bulk of the frame's weight rests on the belt, leaving my arms free enough to pitch the frame up and down and operate the controls.

The belt is a cheap eBay item I bought a few years ago to use as compound bow sling.  The boots are authentically weathered work boots purchased for me by my old company, and the "kneepads" (elbow pads) are from when I used to play airsoft in 2001.  Same with the pistol holster and pouches on the belt.  Save everything!  That's kind of the theme of this whole blog - save your junk in case you ever need to build a robot.

Update 1/8/17:

The total weight of D-Walker's body and attached components is 30 lbs.  The dummy legs + uniform are 8 lbs without shoes (13 with the large boots I used, which I do not recommend). The piston-shoes are 7 lbs a piece - cool to look at but not to wear.  They could be replaced with lightweight replicas.


Wednesday, February 10, 2016

Starside Armory 2015 review

This week is the one year mark for Starside Armory.  In February 2015, I resigned from a pretty decent but mundane job in order to focus on my long time passion for cosplay.  I had saved enough money to cover all of my expenses for a year, plus some funds that would ultimately go almost exclusively into Smooth-On's and Home Depot's pockets.  My plan was straightforward: make high quality props/costume pieces, and sell them.  I believed that between choosing the right projects and perfecting every detail, my work would sell itself.  With the cosplay scene gaining momentum, I finally saw what seemed to be a viable way to follow the advice I have received all my life: "Do something with your creativity".  I always appreciate when people tell me that, and it long ago became a deeply rooted, if fuzzy, goal.  Like many things, it is easier said than done, especially when one of my only other life goals was to play lots of video games.


T-shirt Gundam and duct-tape Knightmare.


The very notion of ramping up my cosplay efforts with profits in mind raised a few doubts in my mind.  The most obvious one was whether it was even economically viable, so I tackled that first.  Having moved to Hawaii when I was 19 with $500 to my name, I have become very good at budgeting for a simple but comfortable lifestyle; video games remain far and away the best bang for your buck (the beach is nice but receives very few content updates).  After I figured out a comfortable monthly budget, I realized that during the last few years spent eliminating debt and saving money, I had already been living on a stricter budget.  Buying myself a year's worth of free time to pursue my ambitions would actually afford me more financial freedom than when I had a job - depending on how you look at it and how far into the future you look, of course.

Another issue I was mulling over was balancing passion and profit.  I wouldn't say I'm morally opposed to earning money, but at the same time, I didn't like the idea of applying a business plan to my hobby - a hobby full of people who regularly act solely out of mutual passion.  Of course, it was not long before I decided it would be inordinately better than continuing to do menial work to earn money for someone else, so this paragraph is similarly not long.

Last, the entire plan was obviously a pretty big risk.  But if languishing in tedium is the alternative, (calculated) risks are worth taking.  The move to Hawaii was a similar risk, and after 12 years of slowly but surely improving my quality of life here, I think I can say I conquered that one.  I also ride a motorcycle everywhere, because the experience and practical benefits far outweigh the risk.   I worked hard, and I wear a helmet.  Risks marginalized.  Focus, determination and planning go a long way.  I will admit that Luck has a lot to do with it too.  If my high school buddy in the Marines had not been stationed here a week after I moved to Hawaii and lent me my second month's rent, I might be a beach bum right now.

Anyway, enough about me - let's talk about cosplay stuff!  It seems my goals for Starside shift with every project, as new considerations come to light and reality sets in.  My first objective was to build a Destiny Warlock costume and attend WonderCon.  I envisioned handing out business cards and collecting commissions.


The costume came out alright, but I spent way too much time in the construction phase and not enough in the painting/weathering.  I opted for a custom Starside-themed palette because I like customization, but I probably should have drawn the line at re-coloring the exotic Voidfang Vestments.  In Destiny, exotics are the only gear that never have alternate color palettes.  I also barely weathered it at all, because most Destiny gear looks pretty shiny.  There is wear and tear, but very little grit and grime (my take on that is like the filter in Star Trek transporters.  Destiny characters constantly summon new guns and hats out of thin air - why reproduce foreign elements?).  I should have just grimed it up anyway, because it always looks cooler that way.

At WonderCon, my first con, the reality set in quickly.  Besides the fact that hardly anyone liked or even recognized Destiny by that point, an even smaller fraction of those people are actively looking for costumers.  They have forums for that, and the con is more a time to bask in the results of everyone's hard work.  I don't much like marketing anyway, so I was happy to not promote myself in any way and just enjoy the event.


The next project on the agenda was Destiny's MIDA Multitool.  I had hoped to get this ready before WonderCon to go with my costume, but that first couple months of being my own boss left a lot of productivity to be desired.  Destiny was also quickly falling out of favor among the community, and I had already abandoned the prospect of making more costumes.  Nonetheless, I had already planned the project out and bought a few supplies for it, and I wanted to see it through.  Using the MDF layering method I learned from Bill Doran's videos, I assembled an extremely faithful reproduction of the gorgeous rifle.


Partly due to picking up an easy/lucrative temp job (gotta diversify) and largely due to playing too much Destiny, the master copy took me a ridiculous four months to finish.  I should also credit the long build time to this being my most intricate prop to date, plus my relative unfamiliarity with the methods and materials.  Eventually I had a solid, detailed replica with a decent degree of shiny lights, interactive parts, and big plans.  As many Destiny scout rifles shared an identical or similar base model, I designed my Multitool to be modular.  The plan was to make a few different front ends - easily the most distinguishing part of each scout rifle - and be able to offer a variety of popular scout rifles all based on the main receiver of the Multitool.  In fact, this vision was part of why I named my company an armory instead of a studio or something.  I pictured racks and racks of rifles on my walls (incidentally, I am now working on this vision from a different angle).


Alas, while I was proud of the finished product, the production process was extremely taxing.  My silicone molds were far from perfect and caused a lot of extra work and grief.  I used six different Rebound 25 jacket molds with fiberglass mothermolds, and rotocasting for certain parts - all new processes for me.  For every successful cast I pulled there were three with a thin/brittle section, misaligned seams, excessive air bubbles, or any combination thereof, and a few molds had inherent structural flaws that were faithfully reproduced each time.  The SmoothCast 300 tended to leak into the mothermold and compound the problems.  Taking a sanding drum to the mothermold between pours was a huge waste of time and coated me and my work area in itchy plastic and fiberglass fibers.  Hawaii was suffering record breaking heat and humidity levels that summer, so I often worked in shorts and a t-shirt.  Temporary irritation from the debris is one thing, but I soon developed week-long rashes from exposure to the resin - at first only in places were I spilled some of it on me, but eventually those same patches of skin would break out just by being near the fumes, even though I worked outside with a fan on me.  After only about six successful sets, the mold and mothermolds alike had deteriorated far enough that the work and resources required was just not worth it, and I retired the molds.  I retired them into the trash bin from my second floor balcony.


The first and best pull.

I could have made new molds, but I decided to cut my losses as my attention was already rapidly shifting to my next project - Venom Snake's bionic arm from Metal Gear Solid V.  Among the many lessons I learned from the Multitool, I was sure that smaller projects were the way to go.  The larger projects carry larger material and labor costs, larger price tags, more difficult shipping, and so on.  I never calculated the profit margin on the Multitool, but I'm sure it was not great even without factoring the months spent on it.  Snake's arm promised to use a fraction of the resin, could be set at a much more attractive price point, and would be way cheaper and safer to ship.  Perhaps most importantly, MGSV was shaping up to be a major hit and I was eager to distance myself from the soulless RNG-grindfest that was Destiny.  In just one month this time (which was still a long time, considering), I finished the prototype and molds for the Snake arm.


I was able to launch this project on September 1st, the same day that MGSV launched.  I only advertised it on the /r/metalgearsolid subreddit and my social media, but that's all it took.  A convergence of factors, some of which I had not even anticipated, rocketed the project to resounding success in a matter of days.  Timing was key, as the fervor surrounding the long-awaited and promising game was at an all-time high.  I had not considered that Halloween was two months away, but as it turned out, probably 75% of my customers wanted it just for Halloween.  The fact that Venom Snake is relatively easy to cosplay was a key factor in the project's success as well - the red arm was the centerpiece of the character design, absolutely iconic, with almost every other piece readily available to the average consumer.  If a prospective Snake cosplayer were so inclined, he could get away with wearing nothing more than pants, an eyepatch, and the bionic arm.


Or whatever floats your boat.


I knew the significance of the arm to the costume would make it a valuable product, but another lucky factor was that seemingly no one else was offering an arm at the same quality and price as mine.  Additionally, seemingly originating solely from the reddit post, my product proliferated among countless video game media outlets hungry for MGSV content.  Etsy tracks where traffic comes from, and I have never heard of 99% of the websites that directed people to my store.  Thank you, video game media outlets!!!  I just wish the pictures that circulated were not of the very first arm I produced, which had a paint job that I quickly improved.  That's what I get for finishing it the night before the game launched, though, and not taking new pictures.


And reusing the same picture here.


Up until the Snake arm project, I may have spent the vast majority of my purchased time enjoying life rather than making money.  September through November were a totally different story.  At my peak, I was producing four arms a day.  My daily schedule for three months straight was something like:

7:00: Wake up, apply next paint steps to last night's batch (Batch A & B).
8:00: Sand, sand, sand, sand sand Batch C.
12:00: Apply first paint step to Batch C
1:00: Assemble Batch A.
3:00: Box and ship Batch A.
5:00 Play MGSV
7:00: Cast new Batch D.
9:00: Next paint step, Batch B & C
10:00: Play MGSV until sleep (batch designations shift one letter back)


Before I figured out an efficient batch schedule.


I also had to prepare for and man a booth at the local Amazing Hawaii Comic Con in late September, at which I didn't even end up having anything to sell because I was falling behind on Etsy orders.  I still had a blast though, and considering I couldn't even make any more arms than I already was, I didn't really care that I didn't make any money there.  I definitely got a lot of exposure and could have made some sales, but it still seems that mass produced goods are the only way to really profit at a con.


Doesn't matter; fultoned Ghost.


Even though I specifically budget time to play video games, every day was still more work than any full-time job I've ever had, and I had just spent the previous 7 months being pretty lazy too.  Also, sanding 25 finger joints per arm got INCREDIBLY TEDIOUS.  Tedium is something I was trying to avoid by being an artist, dammit!  Luckily, I had almost zero failed casts - I learned a thing or two from the Multitool project! - and parts that did fail were so small that it hardly mattered.

The profit margin on materials for the Snake arm was very high, but the time spent on each still felt out of balance.  Additionally, the fact that I was pumping out multiple units per day meant that I was not able to put as much care as I wanted into each.  A good example is in the painting steps.  I started by masking off the underside of each piece where it would be glued to a glove, and painting the underside edges.  More painting phases meant more than triple the amount of time it took to paint each kit, and that was just not viable for the payoff it offered and considering the volume of orders I had.  I soon resorted to only painting the top side, something I am not proud of even if not many people noticed (or complained).


Great costume and customer!


I had a small break when the boat holding my materials order broke down in the Pacific and was sent back to LA.  I also closed orders a couple times to catch up.  During this time I reflected on the value of making stock before offering it for sale.  That was not an option at first, because I wanted to coincide with MGSV's launch date and I didn't have enough stock at that point.  I'm also glad I went with made-to-order because to be honest, otherwise there is no way I would have made so many arms.  Not even close.  I probably should have been charging more.

This hectic period is also when I officially retired the Multitool, because I was struggling to make one of those while Snake arm orders were pouring in and it was just not jiving with my schedule.  I converted the Etsy listing to a digital download of the Multitool blueprints - the first stage in making one for yourself from scratch.  I admit I mostly only did that so that I could keep the picture of the finished product up in my store, but it also turned me on to the immense value of digital items.  I only had to make that blueprint once, and every time I got a sale notification that turned out to be a blueprint that required no further work, I danced a little jig.  Five bucks is five bucks, and passive income is the holy grail of capitalism, after all.

By December, I decided to suspend Snake arm sales.  It was pretty much all because I was just burnt out on sanding those blasted little finger pieces.  Another motivating factor is that I had hit a convenient stopping point - if I made more arms, I would first need to order more silicone (it's really expensive), make more molds, and commit to another 50 something kits in order to get the most out of the molds.  At the time I was not feeling that prospect.  However, requests kept coming in, and sufficient time has passed that I think I can stand to premake a few per week.  I plan to make some more available in March 2016, this time featuring finger pieces with fully painted undersides, baby.


I'll make the Gold and Silver too!


The last reason I cut down on Snake arms is a familiar one - I was eager to get on to the next project.  I learned from Snake that having too many small pieces is almost as bad as working with overly large projects.  Luckily, my next project can be made with a single hunk of resin, and a handful of electronics.  This time, I sat down and made a nice spreadsheet to plan out my material and labor costs and fine tune a more appropriate price point.  This time, I will be making units in advance and making them available when they are truly available.


WIP


Starside Armory's next project is Rick's portal gun!  Rick and Morty is so hot right now, you've watched it, right?  Surely all of Starside's two staff members have watched it by now, RIGHT?!

I certainly appreciate the ease of replicating a prop from a cartoon instead of a 3D model, but I still wanted to make the prop be as functional and pretty as possible, without breaking the bank.  The portal gun will feature a programmable LED display, and a switched set of LEDs for the emitters in front and the, uhh, portal power pod thingy on top.  Nothing too fancy - I am trying to avoid dropping hundreds of dollars of electronics in the thing, and I hope to have the labor time on this down to a much, much more manageable level than my prior projects.


I don't want to sound like I'm setting a low bar here, but my experiences in 2015 definitely tell me that my projects for 2016 should aim for a balance between quality, affordability, and the ability to make them without tearing my hair out.  Down the line I do plan on moving the slider all the way towards quality for certain limited projects, but I can't focus on that until I have a more solid foundation established.  I still have to allocate a significant portion of time to video games, too!

I am also very interested in the digital realm, with my ultimate goal being to design and develop a video game.  That's been in the works for as long as I can remember, but it's going to take a lot more than just hours upon hours of sanding to get it out there.  When I do finish it, it's going to be spectacular.  And as with all of my projects, I hope you will like it :)


Seeya starside,
Curtis

https://www.facebook.com/starsidearmory
https://www.etsy.com/shop/starsidearmory
https://www.instagram.com/starside_armory/

HokuKon '15


Thursday, October 22, 2015

An introduction on how I got into cosplaying

2015 was a great year.

More often than not, years blur together for me. It's always a case of 'Oh my god ________ happened 6 years ago? I felt like it was yesterday!' Stuff like that. I doubt 2015 will get shuffled away in my brain that easily.

The year included traveling far and wide, countless slave labor-like hours (instilled by myself) and a moronic amount of money spent on both. I don't regret a single penny spent. I met and partied with some of my favorite actors and actresses, I shared amazing moments with new friends, old friends and shared them across an array of states. I've become familiar and friends with some people in industries I have a deep interest in. It really has been an amazing year.


Not to mention, 2015 gave (and will give) us Avengers, new Star Wars, Halo and Jurassic World - the last of which my brother had a small role in even.

There is a large part of me that lives in fantasy. Film and Games are huge to me. I love them. I adore the worlds that are created, the intricate characters developed and the epic score to go along with them all. I simply am enamored with good entertainment.

Playing them and watching them inevitably was not going to be enough.

So let's get started

Firstly, I'm a pretty generic 27 year old guy from California. I'm 5'10-5'11, about 180 pounds. About as average as you can be. I work as a creative designer and spent a lot of time at work painting, creating and designing. Don't let any of those words strung together fool you. My talent is pretty much that I like colors and can sometimes put them together to make cool stuff. I have to attribute much of my desire to do this stuff to my family. My brother, whom I share the Starside Armory page you probably found this on with, is an incredible artist and crafter. My mother is a talented painter and encouraged us early to pursue our artistic nature. Truth be told, I'm still puzzled to this day on how it took so long for me to get into this.

To take a step back, in February of 2013, I started looking heavily into making a suit of some kind from a game I loved. At the time, Halo Reach was still very much a huge game interest of mine. The problem was I had no experience, known skills and not a clue on how to go about making such a suit.

Where did I start?

I found a little forum community called the 405th. They're a Halo specific costuming group that is without a doubt some of the most helpful, kind, funny and enjoyable people I have ever met. I have made some lifetime friends and some I talk to every day.

After about a week of research into pepakura, fiberglassing, bondo and the list of little supplies I would need, I gave my friend Jp a call and asked if he was in this thing for real. We settled on costumes too, Mickey for me and Dutch for Jp. Two characters from Halo 3: Odst. The reason being that it was a blend of less complicated costumes (compared to Halo Reach), two characters voiced by some of our favorite actors and finally, for me, a character that actually fit my size a little better. I mean, Spartans are pretty tall...

The next day, with no idea what we were realllly doing, we went to Home Depot and dropped an amount of money that I had hoped would be the end of it.

The first thing I learned about costuming is that - it can get expensive. I will admit I was ignorant at first. Buying small quantities, assuming I wouldn't mess up, guessing wrong on what I needed and how much. To jump the gun, I probably spent $1,000 on my first costume. If I were to do it all again? I guarantee you I could do it for $500. That's just how it goes. You live, you learn, you spend. Will you spend that much? Maybe, maybe not. I will admit, I picked a pretty intricate and expensive costume for a first timer...

Keep in mind, I have no experience in anything not 2d. Really the only thing going for me at this point is I can kind of paint. This isn't meant to be self deprecating, it's meant to show you the scope of possibility in costume making. People have talked to me about the process of making a suit at conventions before only to shrug it off at the end and say to me 'I'm not as good as you are, I don't think I can make a suit like this.' Throw that crap out the door. As corny as it sounds, you never will know until you try.

Here's an attempt at a helmet. With some makeshift size modifications going on.


I failed a lot at first. First I failed at sizing the pepakura files, then I failed at fiberglassing, then at painting - endless mess ups in an overwhelmingly large project that can seem daunting at any time. I admit doing my first costume with a friend was not only motivation, but a really fun activity to share. I've done a few suits by myself now and while it can be relaxing to do things by yourself, I do miss the company.


Getting some traction

After starting in March, it took about halfway through May for things to really start rolling. I had gotten familiar with pepakura forming, fiberglassing and bondoing. The 3 real major steps. Pieces were rolling off of our two man assembly team and by June (With one month to go before our Comic Con goal) we had most of the major pieces assembled. With no experience or idea how to get all this stuff to fit on our body, we did what most people would do - we winged it.

Crude measuring, guessing and checking and a lot of hot glue later, we were starting to see things take shape. With a bit of luck and a bit of reshaping, most things even fit for the most part. Some things, inevitably did not and to the drawing board we went to redesign parts. By redesign, I mean hack at it with a dremel until it fit.

There is nothing more satisfying than putting a piece down that is finished. I am a little OCD about trying to make things perfect. Every time I would finish sanding a piece, I'd find a spot that needed some more bondo, a little more sanding and a little fine tuning. It seemed I would never finish if I kept being so critical of everything.  I eventually learned that perfection to me was not necessary. There's a fine line between 'that will do' and 'this looks 100% perfect'. I land somewhere in the middle. The upshot? Most of the time, it's things that only I would notice.

July, 2013

Comic con is around the corner. I should mention at this point that 3 months is really not enough time for a first time costume. I'll get to that though. With 3 days to go, I have not even put the full costume on yet. With a day before leaving, and having tried lots of parts individually, I finally throw the entire suit on and stand still. Great, it's not exploding. It must be fine.

Wrong.

We pack up our suits, load them into a car, and drive from the Bay Area to San Diego for what I believe to be our 4th straight Comic Con together (I told you these years blur together...). This is the first time I've dressed up for a convention.

The first day of the convention is upon us and the excitement and anticipation is setting in. You never want to think about the possibilities of failure. You just want to think of how awesome your work is and how it's going to be great. Jp and I threw our suits on, gave each other a thumbs up, and waddled down some stairs.

A quick walk would get us on the trolley and down to the convention. The only problem was... we had never properly put our suits on and gone for a stroll to see how walking would be.

Nightmare

Shortly into our walk to the trolley station, straps are popping off, pieces are crushing into each other and the suit is pinching, prodding and poking me in places I didn't know it would because really I had never properly worn the suit. Jp and I turn to each other, admit a brief defeat and retreat back to the house we were staying at. We needed to rethink our suits on the spot.

We were smart enough to bring a small repair kit and quickly realized a few things.

  • Hot glue was not enough to hold all the load bearing straps
  • Our guess and check method of strapping parts on was great, but just fitting on you is not enough, it has to be able to bend and move in a reasonable manner
  • Game models aren't exactly physics friendly
Jp and I spent an hour or so with a dremel, some bondo, straps and velcro and began to work on making the suits more sturdy and usable. After the initial frustrations, we were finally at a point where we could walk. We didn't have time to work out every kink. Every now and again my shoulder strap would fail, my chest piece would sag or my thigh pieces would clunk against my kneepads. We'd perservere.

There are things I wasn't quite ready to make myself yet. I managed to find someone who makes replica pistols from the Halo ODST game and ordered one. I use it to this day and the detail is incredible. I hope to be able to fashion one myself some day, but in the mean time, there is certainly a balance between making your own stuff and reaching out.


The Convention

I was not at all aware of what was to come. We show up at the front of the convention and are immediately swarmed by people. Kids, gamers, people just checking out the convention, anyone and everyone takes a moment to take a peek at a hulking mass of polygonal troopers. The recognition is somewhat flattering. It takes us an hour just to get in through the front doors after all the pictures and small chats with people. After a few hours of cruising the convention floor, we run into some girls dressed in Halo costumes. We revel in the chance to get a group picture of our Halo characters and they ask us "Are you guys going to the Halo photoshoot?" Quizzical looks are exchanged and they explain the 405th does a photoshoot on Saturday.


The 405th

Feeling like a couple of newcomers with inferior costumes, Jp and I arrived at the photoshoot to welcome arms. After a series of seriously cool, goofy and impressive shots, we called it a day and went to change out of our suits. Our first face to face with the 405th group was incredible. We met a few people who to this day, we still meet up with at the conventions, occasionally play games with and generally keep in touch with. 

The convention goes on for its duration, and we soak in the elements that we love. The games, movies, actors/actresses, trinkets, atmosphere and general occasion of it all. There's truly nothing better it seemed.

2014, 2015 and beyond

Our infantile stages of costuming were now over. I went into the new year dedicated to really reshaping my ODST costume into a comfortable (I use that term loosely) costume that I could wear again and again. I redid many of the straps, edges, added some fans and even made a few new little pieces. With no immediate deadline, I could take my time and do everything right.

There was no way I was going to stop at 1 costume. I do, however, absolutely cherish my ODST suit. It is one of the single most significant objects in my life. The literal blood, sweat and tears that went into making it endear it to me some, as well as being able to call it my first of many creations. It introduced me into a world I didn't think was out there. 

It got me into a hobby that I have found to love. It also gave me some life direction. My job is great. I do aspire for more though. The end goal of most people's lives is to love their work, right?

Opportunities have come up ever since we've made our costumes. Last year at Anaheim's 'Wondercon' I got the chance to be a part of a panel that helped be an introduction to costume making.


I've dabbled in numerous other projects since my Halo suit. I started digging into other costume methods, foam, cloth, hybrids, and have recently been trying to delve into 3d printing. I've accrued more tools than I thought I ever would, transformed part of my room into a station dedicated to parts of the costume making I do and have used all of this to make a foam Destiny costume, an Emile from Halo Reach costume and most recently, an almost-finished Star Lord costume.


I still stick to my strengths these days which is painting. I do it for a job and therefore, the experience has thankfully rubbed off on my hobby. I really enjoy the painting process. I've had the joy of working with acrylics, airbrushing, spray painting, dyeing and all sorts of permutations.


Starisde Armory

My brother came to me with an idea one day for a way to share our artistic endeavors. A popular trend for people who either create things for themselves, for other people, or both, was to come up with a representative name, and a page to share their projects on. Starside is a reflection of how we really came into the gaming world at all. There is a little game some of you may know by the name of Marathon, by a little company at the time called Bungie. The sign off from your team mates as they leave an area?

'Seeya Starside'

Needless to say, it stuck, and here we are.


There was a point to all this, right?

Self reflection is great and all, but why should you care? Well here's what I've experienced in my short travels.

When I first started going to conventions, I marveled at some of the costumes I saw. It made my day. When I saw a costume from a favorite tv show or game, it made me smile, point and look, take a picture and enjoy the work someone had put in to share with the world.

I wanted that. I also am aware of the self admiration aspect. I am truly proud of a lot of the things I've made - and in a way that I don't need other people to love it, for me, being proud of my own work is special. More than that though, I want people to act on their own desires. I have come across hundreds of people that ask me how I make my costumes only to end with 'I don't have what it takes to make something like that!'

You do though. How do I know? Because I had zero background in costume making. I had zero experience with any tool that had an on/off switch. No knowledge of where to start, where to look, how to do this, how to do that. I started with nothing.

My journey should be no different than anyone else's. I implore ANYONE who has even remotely thought about making a costume to look into it and try it. The guides, tutorials, active help, communities are out there. All of the resources are out there and it's possible.

Some helpful places to look would be

RPF The role playing forum, a great source of things not Halo related

405th The Halo-centric forum. Where I learned everything about my first costume

Punished PropsA helpful facebook page to look at ran by Bill Doran - who makes wonderful tutorials, especially on foam crafting which is a very popular method of costume making.

Make something, you could really like it. I've learned to love it.